
Two-Factor Authentication အသုံးပြု၍ Ubuntu Linux လုံခြုံရေး ဘယ်လိုမြှင့်တင်မလဲ။

Ye Minn
Contributor
2 min read
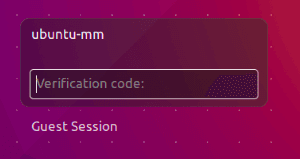
ယနေ့ခေတ်မှာ သတင်းအချက်အလက်လုံခြုံရေး ( Information Security ) သည် အလွန်အရေးကြီးသည့်အခန်းကဏ္ဍကနေပါဝင်နေပါတယ်။ ထို့အတူ ဟက်ကာတွေနဲ့ Security ဂုရုကြီးတွေလဲ နေ့စဉ်အမြဲ အားပြိုင်နေကြတဲ့အချိန်မှာ ကျန်တော်တို့လို ပရိသတ်တွေအနေနဲ့လဲ ကျန်တော်တို့ရဲ့ အချက်အလက်တွေကို ဟက်ကာတွေ လွယ်လင့်တကူ မရရှိနိုင်အောင် တတ်နိုင်တဲ့နည်းနဲ့ ကာကွယ်ထားသင့်ပါတယ်။
Two-Factor Authentication (2FA) လို့ခေါ်တဲ့ လုံခြုံရေးစနစ်ကို အသုံးပြုပြီး ကာကွယ်နိုင်ပါတယ်။ 2FA သည် အသုံးပြုသူ၏ username, password အပြင် အသုံးပြုသူ၏ ဖုန်းထံသို့ ပေးပိုမည့် verification code တို့လိုအပ်ပါတယ်။ ဟက်ကာမှ password သိသွားသော်လည်း verification code ကို ရရှိရန်မလွယ်ကူနိုင်ပါ။
Ubuntu Server နှင့် Ubuntu Desktop နှစ်မျိုးလုံးအတွက် Google Authenticator အသုံးပြုပြီး လုံခြုံရေးစနစ်တိုးမြှင့်နည်းကို ဖော်ပြပေးပါမည်။
အဆင့် ၁
Google Playstore သို့မဟုတ် Apple Appstore မှ Google Authenticator app ကို install ပြုလုပ်ပါ။
အဆင့် ၂
ubuntu တွင် google authenticator library သွင်းရန် terminal တွင် အောက်ပါ command ကို ရိုက်ထည့်ပါ။
sudo apt-get install libpam-google-authenticator -y
အဆင့် ၃
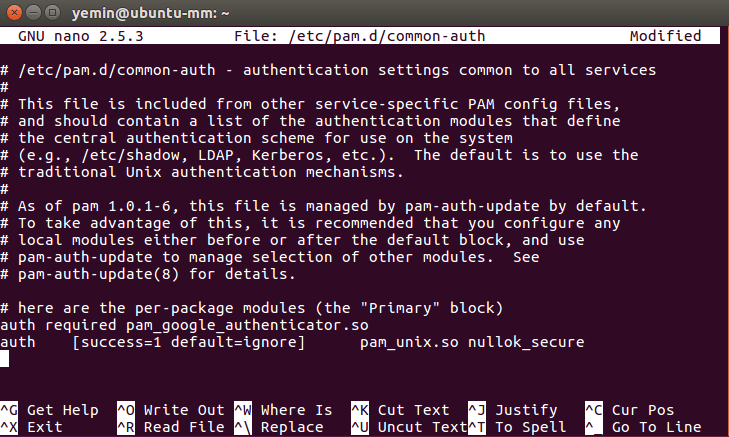
nano, vim, gedit စတဲ့ text editor တစ်ခုခုနှင့် “common-auth” file ကို ပြင်ပေးရပါမည်။
sudo nano /etc/pam.d/common-auth
FIle ထဲရောက်လျှင် ပုံတွင်ပြထားသည့်အတိုင်း File ၏အောက်ဆုံးတွင်
auth [success=1 default=ignore] pam_unix.so nullok_secure
auth required pam_google_authenticator.so
နှစ်ကြောင်းရေးပီး file ကို သိမ်းရန် Ctrl+X ရိုက်ပီး Y ရိုက်ပါ။
အဆင့် ၄
Google authenticator နှင့် ubuntu account ကို ဆက်သွယ်ပေးရန်အတွက် terminal တွင်
google-authenticator
ရိုက်ပါ။ ပုံတွင်ပြထားသည့်အတိုင်း မြင်တွေ့ရပါမည်။
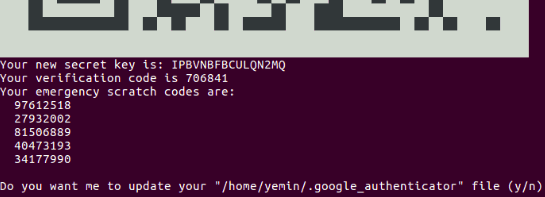 QR code နှင့် secret key သည် google-authenticator app တွင် ထည့်သွင်းပေးရန်ဖြစ်သည်။
verification code သည် တစ်ကြိမ်သာအသုံးပြုခွင့်ရသည့်နံပါတ်ဖြစ်ပြီး နောက်ထပ်အသုံးပြုရန် google-authenticator မှစက္ကန့်ပြည့် တစ်ကြိမ်စီ ထုတ်ပေးမှာဖြစ်ပါတယ်။
emergency scratch code သည် တစ်ကြိမ်သာအသုံးပြုခွင့်ရသည့်နံပါတ်ဖြစ်ပြီး ဖုန်းကျန်ခဲ့သည်ဖြစ်စေ ပျောက်ဆုံးခဲ့သည်ဖြစ်စေ အရေးပေါ်အခြေအနေအသုံးပြုရန်အတွက်သာဖြစ်သည်။
အဆင့် ၅
ထို့နောက် မေးခွန်းတွေမေးပါလိမ့်မယ်။ မေးခွန်းအားလုံးကို Yes (y) နှိပ်သွားလျှင် ပြည့်စုံပါတယ်။ 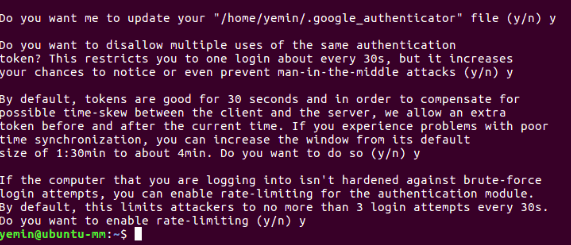
အဆင့် ၆
Google authenticator app ကိုဖွင့်ပါ။
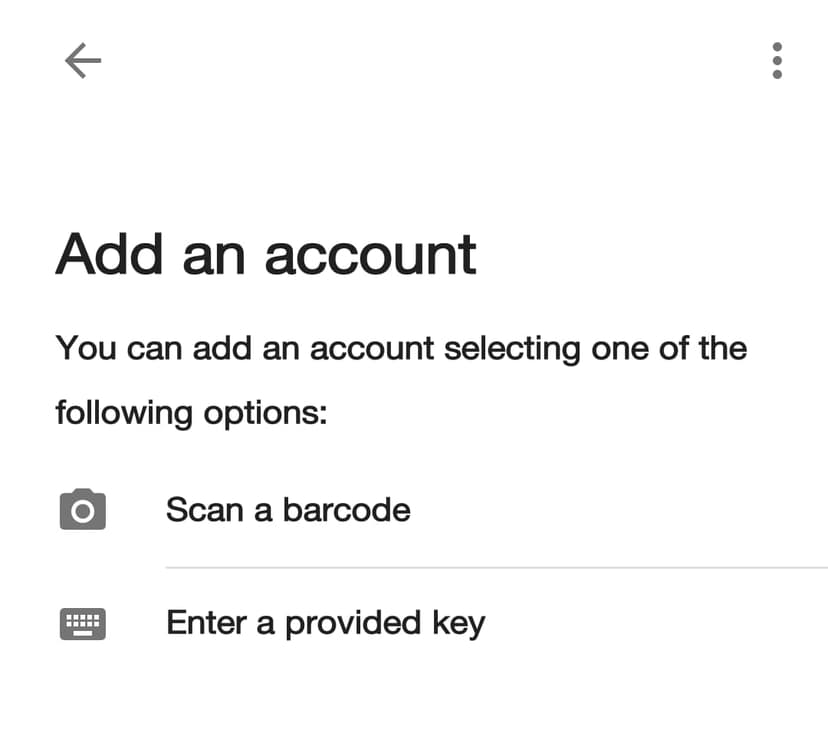
account ချိတ်ဆက်ရန် နည်းလမ်း ၂ မျိုးရှိပြီး barcode ဖြင့် ပြုလုပ်လိုရင် “Scan a barcode” ကိုနှိပ်ပီး အဆင့် ၄ မှ QR code ကို scan ဖတ်ပါ။
“Enter a provided key” ဖြင့်လုပ်လျှင် account name တွင် ubuntu user name ကို ရိုက်ထည့်ပြီး Key တွင် အဆင့် ၄ မှ secret key ကို ရိုက်ထည့်ပေးရမှာဖြစ်ပါတယ်။
Verification code ပေါ်လာလျှင် 2FA လုပ်ဆောင်မှု အောင်မြင်ပါသည်။
Related posts

What is acl?
Linux မှာရှိတဲ့ file တွေ directories တွေကို ACL(Access Control Lists)ကိုအသုံးပြုပြီး secure ဖြစ်အောင်ဘယ်လိုလုပ်မလဲ။ ပုံမှန်သုံးနေကျ read,write,execute permission တွေကို chmod,…
 Wai Yan Win Htain
2 min read
Ubuntu Wants to Collect Data About Your System
Ubuntu မှ သင့် system နဲ့ပါတ်သတ်သည့် data တွေကို collect လုပ်တော့မည် လွန်ခဲ့တဲ့ ၂ လပိုင်း၊ ၁၄ ရက်နေ့က ubuntu က သင့်ရဲ့အကြောင်းကိုပိုမိုသိရှိရင် system data တွေကို collect…
Wai Yan Win Htain2 min read

Ubuntu weekly September Security 14
Ubuntu security team ရဲ့ လုပ်ဆောင်ပုံလေးတွေကို မရင်းနှီးတဲ့ သူတွေအတွက် အပတ်စဉ် ဘာလုပ်ကြလဲဆိုတာ သိစေခငျ်လို့ပါ။ address link တွေကို စကားပြောနဲ့ ပြောသွားတော့ အဆင်မပြတော…
 Thohi
Thohi1 min read