
Raspberry Pi GPIO Intro

Ko Ko Ye
Founder
5 min read


linux@gpio ~#cat readme.txt
What is GPIO ? How can do with GPIO ? and Its basic usage
ကျနော်အခု rasppberry pi ကနေ Gpio ကို python programming ကနေ တဆင့် ထိန်းချုပ် တဲ့ ပုံစံလေးကို ရှင်းပြချင်ပာတယ်။
GPIO (general purpose input/output ) pin အရေအတွက်ဟာ ကျနော်တို့ အသုံးပြု တဲ့ raspberry pi model အလိုက် ကွဲလွဲမှုတွေရှိနိင်ပာတယ်။
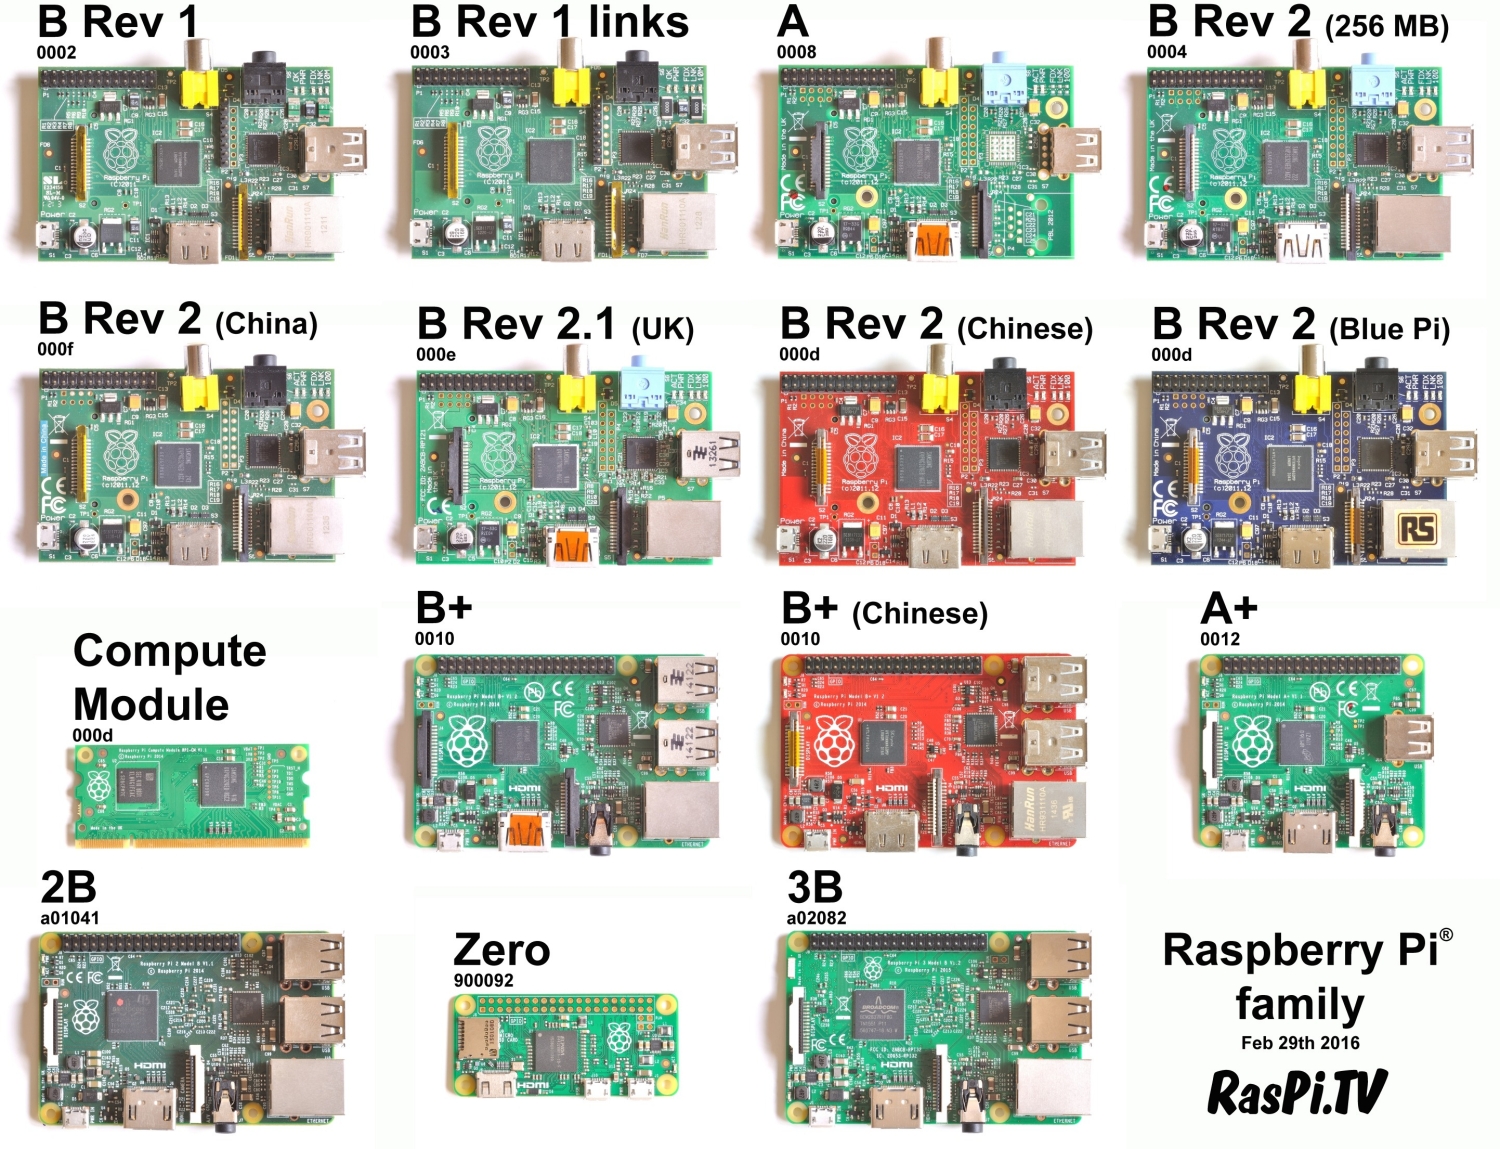
raspberry pi 1 model A/B တွေမှာ GPIO pin 26 pin ပဲပါတယ်။
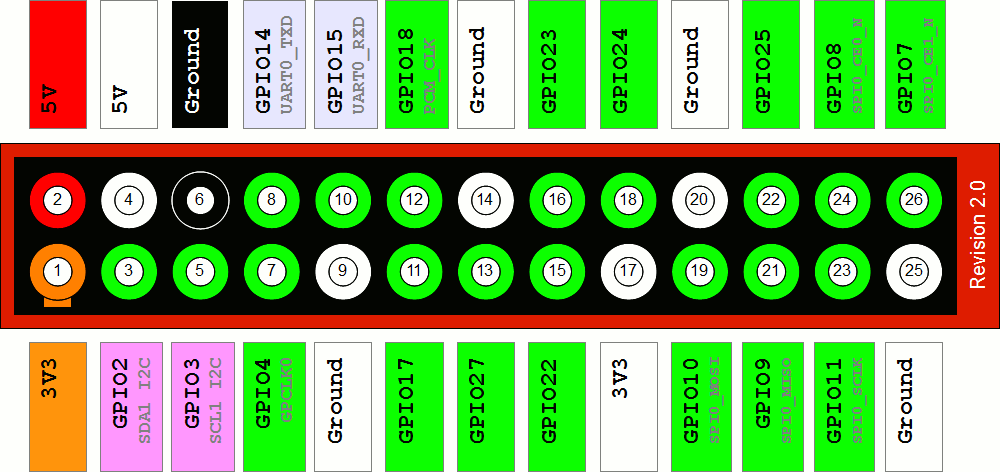
Raspberry Pi GPIO
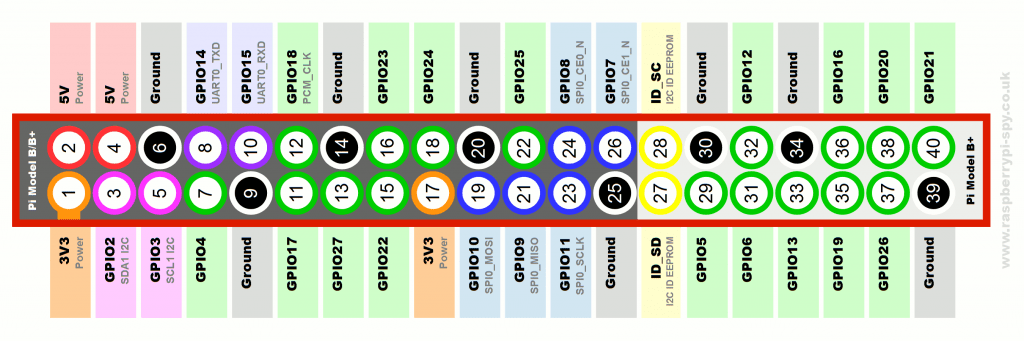
pi 1 model B+ , A+ , pi 2 model B နဲ့ pi 3 model B မှာ ကျတော့ GPIO pin 40 ပာပာတယ်။
**
GPIO pin ကနေ ဘာတွေလုပ်လို့ရလို့လဲ ။ အရေးကြီးလို့လား ။**
ကိုယ်သုံးတဲ့ပော်မှာ မူတည်ပာတယ်။ media server လိုမျိုးတို့ ၊ file server တို့ လိုမျိူ;ပဲ စမ်းချင်တာ ၊ လုပ်ချင်တာဆိုရင်တော့ GPIO pin တွေအကြောင်း မသိရင်လည်း ရပာတယ်။ အကယ်လို့ Home automation ပိုင်းတွေ ( example အနေနဲ့ လက်ခုပ်တီးလိုက်ရင် မီးဖွင့်တာတို့ ။ မီးမှိတ်တာတို့ ။ ရေကန်ထဲမှာ ရေ မရှိရင် ရေစက်ကို auto
မောင်းတင်ခိုင်းတာတို့ ) ၊ robotic ပိုင်းတွေ ၊ electronic device တွေ ၊ sensor တွေနဲ့ ချိတ်ဆက်လုပ်ချင်တာမျိုးတွေကျ GPIO ကမသိမဖြစ် လိုအပ်လာပာတယ် ။
GPIO pin တွေနဲ့ အလုပ်လုပ်တဲ့ အခာမှာ သိထားသင့်တာလေးတွေကို အောက်မှာတချက်လောက်ဖတ်ကြည့်ပာ ။
(၁). GPIO pin တခုချင်းစီကနေ ယူတဲ့ current က 3mA ထက်မပိုသင့်ပာ။
(၂). GPIO pin တွေကို raspberry pi power on ထားချိန်မှာ screw driver နဲ့ ထိခြင်း ၊ metal object တခုခုနဲ့ ထိခြင်းမလုပ်ပာနဲ့ ။
(၃). Pi ကို power ပေးတာ 5V ထက် မကျော်ပာစေနဲ့ ။
(၄). 3.3V supply pins တွေဆီကနေ ယူသုံးတဲ့အခာ total 50mA ထက် ပိုမသုံးသင့်ပာ ။
(၅). 5.5V supply pins တွေဆီကနေ ယူသုံးရင် total 250mA ထက်ပို မသုံးသင့်ပာဘူး ။
GPIO pin တွေကို ဘယ်လိုအသုံးချမလဲ ။
programming languages တွေနဲ့ program တွေရေးပြီး GPIO pin တွေကို အသုံးချနိုင်ပာတယ် ။
အခု ကျနော်က python programming နဲ့ GPIO ကို access လုပ်တာလေးပြချင်ပာတယ် ။
လိုတာကတော့ python library လေးဖြစ်တဲ့ Rpi.GPIO လိုပာမယ် ။
အဲ့ဒီကောင်လေးက python နဲ့ native C ပုံစံကို wrap လုပ်ပြီး Input / Output ပိုင်းကို မြန်ဆန်စေဖို့အသုံးပြုတယ် ။
ကျနော် installation processကို raspbian OS အသုံးပြု ပြီး ပြပာမယ်။
raspbian OS ကို အသုံးပြုမယ်ဆို ( http://vx2-downloads.raspberrypi.org/raspbian/images/raspbian-2016-05-31/2016-05-27-raspbian-jessie.zip ) အဲ့link ကနေ download ရယူုနိုင်ပာတယ် ။
အဲ့တာကိုသွင်းဖို့ အတွက် အရင်ဆုံး terminal ကနေ
sudo apt-get update
sudo apt-get upgrade
sudo apt-get install python-dev
sudo apt-get install python-rpi.gpio
အစဉ်လိုက် တကြောင်းချင်းစီရိုက်ထည့်ပေးပာ ။
အရင်ဆုံး repositories တွေကနေ ရနိုင်မယ့် package တွေကို update လုပ်ပာတယ် ။
ပြီး ရင် ကိုယ့်စက်ထဲမှာရှိနေတဲ့ software တွေကို upgrade လုပ်ပာတယ်။
နောက်တဆင့်က python-dev ကို သွင်းပာတယ်။
ပြီးတော့ library ကို သွင်းပာတယ် ။
Ok , အခုမှ စမှာဗျ။
python နဲ့ GPIO control program တွေရဲ့အစတိုင်းလိုလိုမှာ
import Rpi.GPIO as GPIO လို့ရေးပြီး GPIO functions တွေကို GPIO name ပေးပြီးခော်သုံးပာတယ် ။
ပြီးတော့ GPIO pin တွေကို သုံးဖို့ mode ရွေးရပာတယ်။
mode သတ်မှတ်တဲ့နေရာမှာ 2 မျိုးရှိပာတယ်။
(၁) BCM numbering ပုံစံ
(၂) Board numbering ပုံစံ
BCM numbering mode ဆိုတာက GPIO pin တွေကို broadcom soc channel အနေနဲ့ refer လုပ်တာပာ ။
Board numbering modeဆိုတာက GPIO pin တွေကို နံပာတ်စဉ်လိုက် သတ်မှတ်တာပာ ။
သေချာနားလည် သဘောပောက်အောင် အပော်ကပုံလေးနှစ်ပုံကို ပြန်ကြည့် ကြည့်ပာ ။
လေးထောင့်တုံးလေးတွေမှာရေးထားတာက BCM အနေနဲ့ သတ်မှတ်တာပာ ။ အလယ်ကပုံစံက board အနေနဲ့သတ်မှတ်တာပာ ။
GPIO.setmode(GPIO.BCM)    # refer GPIO pins as BCM numbering
GPIO.setmode(GPIO.BOARD)  # refer GPIO pins as BOARD numbering
ကျနော် နောက်ပိုင်း BCM mode အနေနဲ့ သတ်မှတ်ထားတဲ့ပုံစံနဲ့ပဲ ဆက်ပြသွားပာမယ် ။
GPIO.setwarnings(False) ဆိုပြီး GPIO runtime warning ကိုdisable လုပ်ထားလို့ရပာတယ်။
ပြီးရင် input or output အတွက်သတ်မှတ်ပေးရပာတယ် ။
GPIO.setup(7,GPIO.OUT)   # set GPIO 7 as output
GPIO.setup(8,GPIO.IN)    # setup GPIO 8 as input
GPIO.setup(23,GPIO.IN,pull_up_down=GPIO.PUD_DOWN) # set GPIO 23 as input and enable pull-down resistor on pin 23
GPIO.setup(24,GPIO.IN,pull_up_down=GPIO.PUD_UP)   # set GPIO 24 as input and enable pull-up resistor on pin 24
GPIO 7 နဲ့ 8 သတ်မှတ်တာကတော့ ပုံစံရှင်းပာတယ်။ output input ရိုးရိုးပာပဲ ။
23 နဲ့ 24 မှာတော့ ကျနော်တို့ input မှာ pull-up , pull-down resistor သတ်မှတ်ပာတယ် ။
pull-up pull-down ဘာလို့သတ်မှတ်တာလဲ ။ မသတ်မှတ်ရင်ရော မရဘူးလား ။
input မှာ pull up or pull down resistor မချိတ်ထားဘူးဆိုရင် floating state အနေနဲ့အလုပ်လုပ်ပာတယ်။ GPIO input pin ကို ချိတ်ထားတဲ့ wire ကနေ radio wave ၊ electromagnetic radiation ပုံစံမျိုးတွေရပြီး input value တွေကို လွဲချော်ထိခိုက်စေပာတယ်။
OK , motor နဲ့ ပန်ကာဒလက်အကြီးစားတွေလည်အောင် GPIO input pin တွေနဲ့ ထိန်းတယ်ဆိုပာတော့ ။ default အနေနဲ့ပဲထားတော့
မလိုအပ်တဲ့random change of state လိုမျိုး value တွေဝင်လာမယ်ဆိုရင် ပန်ကာကမလိုအပ်တဲ့အချိန်မှာထလည်တာတို့ လိုမျိုးဖြစ်တတ်ပာတယ်။
pi မှာ built in pull-up pull-down resistor ပာပာတယ် ။
pull_up_down=GPIO.PUD_UP ဆိုပြီး pull up resistor ကို သုံးမယ်လို့သတ်မှတ်ပေးလို့ရပာတယ်။
pull_up_down=GPIO.PUD_DOWN ဆိုရင်တော့ pull down resistor ကို သုံးမယ်လို့ သတ်မှတ်တာပော့။
default ဆိုရင်တော့ GPIO.PUD_OFF ပော့ ။အဲ့ဒာကတော့ ထည့်မရေးလည်းရပာတယ်။
output or input လုပ်တာလေးတွေကိုတချက်ကြည့်ကြည့်ပာ။
GPIO.output(24,1) ( 1 နေရာမှာ GPIO.LOW,GPIO.HIGH,1,0,TRUE,FALSE သုံးလို့ရပာတယ်)
(GPIO 24 ကို output 1 ထုတ်တာလေးပော့)
input=GPIO.input(13) ( GPIO 13 ကနေဝင်လာတဲ့ value ကို input ဆိုတဲ့ variable ထဲသိမ်းလိုက်တာပာ)
နောက်ပြီး GPIO pin တွေကနေ clock generator ပုံစံထုတ်လို့ရပာ
တယ်။
GPIO.setup(4,GPIO.ALT0) #GPIO 4 ကို clock genအနေနဲ့ သတ်မှတ်တယ်
GPIO.setclock(4,64000) #clock frequencyကို HZ အနေနဲ့သတ်မှတ်တယ်။
# frequency က 4640 ကနေ 19000000 range ထဲပဲ ရှိသင့်တယ်။
GPIO.output(4,1) # turn on the clock
GPIO.output(4,0) #turn off the clock
GPIO.setclock(4,500000) #frequency ပြန် changeတယ်#
GPIO.cleanup() #GPIO pin တွေအာားလုံးကို reset ပြန်လုပ်တာပာ။
အခုက GPIO module ထဲကအခြေခံ လေးတွေကိုပြောပြတာပာ ။
သူ့ထဲမှာမှ နောက်ထပ် function (eg . wait_for_edge တို့ add_event_detect တို့ ) တွေကို ဆက်လေ့လာကြည့်ပာ ။
ပြီးတော့ i2c ဆိုတဲ့ servo motor တို့ pulse width modulation ပိုင်းတွေနဲ့ ဆက်စပ်လုပ်ဆောင်တဲ့ library အကြောင်းလေးလည်း
ဆက်လက်လေ့လာကြည့်ကြပာ။
raspberry pi device က linux base OS တွေနဲ့ အလုပ်လုပ်တဲ့ အတွက်ကြောင့် linux command တွေကိုလည်း မဖြစ်မနေသိထားသင့်ပာတယ်။
အဲ့ဒာကြောင့် အသုံးများတဲ့ linux command တွေနဲ့ ထိတွေ့နိုင်အောင် ဆက်ရေးပာ့မယ်။
command တကြောင်းမှာ command / option(switch) / argument ဆိုပြီး သုံးပိုင်းခွဲနိုင်ပာတယ်။တချို့ command တွေကျ argument လိုပာတယ် ။ တချို့ကျတော့မလိုပာဘူး။
အခုပြောမယ့်ထဲမှာတော့ သိဖို့လုံးဝလိုအပ်တဲ့ command switch လေးတွေပဲထည့်ပြောပေးပာ့မယ်။
~ means can replace with another.
uname -a                 # print all system information
uname --help             # get some info about uname command
ls                       # list directory
ls -al                   # list all with long format
uptime -p                # system runtime
df -h                    # disk space usage in human readable form
whoami                   # print current user
cd ~location             # change directory
mkdir ~directory         # make directory
rm -r ~directory         # delete directory
cp -i ~sourcefile ~newfile   # copy
whatis ls                # display one line manual for ls command
top                      # display process
clear                    # clear terminal
reset                    # reset terminal
date                     # print date time info
cal                      # print calendar
touch ~file              # create file
pwd                      # print current working directory
ping -c3 www.google.com  # ping google 3 times
head ~file               # output first part of file
tail ~file               # output last part of file
cat ~file                # output entire file
less ~file               # output file less
more ~file               # output file more
မသိမဖြစ်သိထားသင့်တဲ့ Linux commandလေးတွေပာ။
အားလုံးအဆင်ပြေကြမယ်လို့မျှော်လင့်ပာတယ်။
AungKyaw Phyo
Related posts

Ubuntu Surfing – Ubuntu Myanmar Wiki [gitbook – epub]
Ubuntu သမားတွေအတွက် မရှိမဖြစ်လို့တောင် ပြောလို့ရတဲ့ Wiki တစ်ခုရှိပါတယ်။၂၀၁၁ လောက်က အဲဒီ Wiki ကို မှီငြမ်းပြီး မြန်မာဘာသာ ပြန်ခဲ့ကြပါတယ်။ အဲတာကို Ubuntu Myanmar Wiki ဆိုပြီး…
 Ko Ko Ye
2 min read

The Call for Participation is now open for Ubuntu 22.04 Release Party
To celebrate the new release of the popular free and open source GNU/Linux distribution Ubuntu 22.04, we are going to hold a release party. The event will take place on the 1st of…
 Zaw Ye Lwin
1 min read